Welcome to Your New Pixel Life.
If you’ve just logged into Second Life for the first time, congratulations! You’ve officially joined one of the most fascinating, confusing, and creatively chaotic platforms ever built. It’s not a game in the traditional sense. There are no quests, no levels, and definitely no rulebook that explains why your avatar’s left foot is buried in the ground.
Second Life is a world built almost entirely by its residents. Every beach house, nightclub, café, hairstyle, and pair of jeans was designed by another person somewhere on the planet. That’s the magic, and the mess of it. You can be anyone, live anywhere, and design nearly everything you see. But before you can do any of that, you need one thing: an avatar that feels like you.
That’s where this guide comes in.
Why This Second Life Avatar Survival Blueprint Exists
Second Life has been around for over two decades, yet its learning curve still resembles a ski slope. If you’ve ever wondered why your friend’s avatar looks like a polished digital model while yours resembles an IKEA mannequin, it’s not because you’re doing something wrong. It’s because Second Life never really explains how things work.
This blueprint is here to fix that.
It’s designed to help you understand the basics of your avatar: your body, head, skin, and everything in between without drowning you in jargon or outdated tutorials. Think of it as your friendly handbook before you start experimenting, shopping, or accidentally detaching your head.
Each section of this guide focuses on one key part of your avatar – bodies, heads, shapes, skins, and HUDs – and links to a dedicated page that dives deeper into that topic. That way, if something changes (and it always does in Second Life), the pages can be updated easily without rewriting the entire guide.
By the end, you’ll know what to buy, how to match things properly, where to find demos, and how to avoid wasting money on stuff that doesn’t fit. You’ll also get a few tips for navigating the culture shock that comes with discovering that avatars can blink, breathe, and occasionally, crash your viewer.
Before Anything Else: Choose Your Username Wisely
Before you even start thinking about your Second Life avatar’s body, head, or wardrobe, take a moment to choose your username carefully. It’s the one thing in Second Life you can’t easily change later.
Yes, you can set an on-screen display name (so you can show up as Lara Croft if you want) and even purchase an official last name through your account. But here’s the catch: you don’t control how others see you. Every user can choose whether to view display names or the old-school legacy names, which means someone might still see you as Smellybutt Resident even if you’ve spent hours crafting the perfect look.
So before you click “Create Account,” pick something you can live with long-term, professional enough to use in communities, easy to type, and ideally, not something that makes you cringe in six months. Your username follows you everywhere: in chat logs, in groups, on your Marketplace store, and even when people tag you in photos.
![]()
Creating Your Second Life Avatar
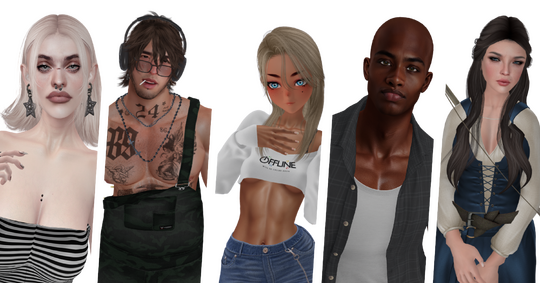
Your avatar is your digital self. It’s how you move, look, and express personality in Second Life. Whether you want to recreate your real-world appearance or become a neon space mermaid with cybernetic legs, everything starts with a few core components.
Below is a quick overview of what makes up a modern Second Life avatar and why each piece matters. Each topic will have its own dedicated page where you can explore in more detail, compare brands, and get update notices as the world evolves.
Note on Senra and Starter Packs
Second Life’s free avatars, Senra Blake and Jamie, are technically mesh bodies. They look modern and work with Bakes on Mesh (BOM), but they’re limited in what you can customise. You can’t detach the head, replace the body, or edit most parts beyond the basic sliders.
You might also see Linden Lab’s Starter Packs that include bodies, heads, and clothing from well-known creators. These packs are designed to give you a polished, ready-to-go look right away. The catch? Many are locked or simplified versions of premium products. You can’t mix and match easily, and upgrading later can get confusing if you don’t understand how bodies, heads, and skins fit together.
They’re great for experimenting, but think of them as training wheels, not your forever avatar.
Before You Begin: Understanding the Two Main Parts of an Avatar
Before diving into heads, bodies, and everything in between, there’s one crucial thing to understand: your Second Life avatar is built from two main components, the body and the head.
They’re made separately by different creators, and each one needs its own compatible skin. When you buy a skin in Second Life, you’re usually purchasing either a head skin or a body skin, not both.
To make them match, you’ll need:
- A head skin that fits your chosen head brand (for example, Lelutka EvoX).
- A body skin that fits your chosen body brand (for example, Maitreya, Legacy, or Reborn) and matches the one on your head.
Most skin creators sell matching sets, but they’re in separate packages. It’s a small but essential detail that trips up almost every newcomer, and we’ll explain it properly in the Skins section.
One-Piece Avatars
Of course, there are a few brands that sell complete mesh avatars, head and body combined in one product. These can be appealing because they work straight out of the box. A good example is the Star Mesh avatar and similar “all-in-one” systems.
However, they’re not mainstream and can be limiting. Most clothing, skins, and accessories on the market are designed for separate, well-known bodies like Maitreya, Legacy, or Reborn. Choosing a full-package avatar might save time at first but can make shopping, upgrading, or customising more difficult later on.
A Quick Reality Check About Creating Your Second Life Avatar
If this already sounds like a lot, that’s because it is.
When new users join Second Life, they’re often surrounded by helpful (and sometimes pushy) “experts” eager to give advice on how to “upgrade” their look. Unfortunately, that advice often skips the basics, like how heads and bodies are separate, or how each body brand needs its own clothes and skins.
It can feel overwhelming, especially for men who just want a simple look, or for women who quickly discover that much of what’s sold is, let’s say, more revealing than practical. Add a few “noob-hunters” with questionable motives, and it’s easy to see why many people give up before they ever feel comfortable.
This blueprint exists so you don’t have to. By the time you finish, you’ll understand how to build an avatar that looks like you want, functions properly, and doesn’t rely on anyone else’s “help” to get there.
1. Second Life Mesh Bodies
This is your foundation, the overall shape of your avatar. Second Life now includes a free mesh avatar called Senra, available in male (Blake) and female (Jamie) versions. It’s a great starting point because it looks better than the old system body and uses modern BOM layers. But if you want full control over your look, or plan to shop for clothes and accessories, you’ll eventually want to upgrade to a third-party mesh body like Maitreya, Legacy, or Reborn, among many others.
Mesh bodies look smoother, move better, and let you wear modern clothes. Different brands cater to different styles: some are slim and elegant, others curvy and sculpted. You’ll need to pick one that fits both your taste and your wardrobe goals.
2. Second Life Mesh Heads
Your head gives your avatar its unique personality. The starter head works fine, but if you want expressions, detailed features, or makeup options, you’ll want a mesh head.
Popular head brands like Lelutka, Catwa and Genus allow for blinking, smiling, and endless customisation. The key is finding one that suits your style, and that’s compatible with your chosen body and skin.
3. Second Life Shapes
Think of shapes as your digital DNA. They control your height, shoulders, curves, and facial proportions. You can edit shapes yourself using sliders or buy custom ones created for specific bodies and heads.
A shape can completely change your look, even if you’re using the same body and head as someone else.
4. Skins & BOM
A skin is what makes your avatar look human (or not). It adds tone, detail, freckles, pores, tattoos, and more.
Most modern avatars use Bakes on Mesh (BOM), a system that layers your skin and tattoos directly onto your mesh body and head. Once you understand BOM, everything about appearance becomes easier.
→ Jump to skins, BOM, and alpha layers
5. HUDs
HUD stands for Heads-Up Display, but think of it as your control panel. Every mesh body or head you buy comes with its own HUD that lets you hide body parts under clothes, change nail shapes, switch expressions, or apply skins.
It might look intimidating at first, but you’ll quickly get the hang of it. It’s basically the remote control for your new self.
6. AO
An AO (Animation Override) controls how your avatar stands, walks, sits, and moves when you’re not using furniture.
Without an AO, your avatar uses the default animations, which are… dated. An AO doesn’t change how your avatar looks, but it massively changes how they feel to move around. It’s the difference between sliding awkwardly and looking intentional.
You don’t need one on day one, but most people end up using an AO sooner or later.
7. Avatar Physics
Avatar physics control subtle movement in certain body parts when your avatar walks or dances. Think softness, not mechanics.
Physics are handled by a wearable physics layer. It’s optional. Many people don’t use one at all. When kept light, physics can make an avatar feel less stiff. When pushed too far, they can get… distracting.
You might also notice some avatars with very exaggerated jiggle. That usually comes from attachment-based add-ons, not physics layers, and those are very much a personal choice.
This is not something you need to worry about early on. It’s a “nice later” detail, not a requirement.
8. Fitting Rooms
Second Life is not a cheap world, and not everyone has land to go home to. If you need somewhere private to change, try on demos, or just figure out your avatar without an audience, the Fitting Room is exactly that. It’s free, it’s secure, and there’s a volunteer mentor on hand if you need help. There’s even a pool area to hang out in when you’re done.
No Lindens required.
About complexity –> coming soon
What to Buy First
When you’re ready to upgrade, start in this order:
Choose a body: your foundation. Maitreya, Legacy, or Reborn are safe beginner options.
Pick a head: Lelutka EvoX heads are widely supported.
Get matching skins: head and body skins should come from the same creator to avoid visible seams.
Find a shape: start with a free one or buy a modifiable version. Tweak it until it feels like “you.”
Add hair, clothes, and accessories, once your base avatar works, the fun begins.
If that sounds like a lot, it is. But it’s easier when you take it one step at a time. Demo everything before buying, and don’t be afraid to experiment.
Money-Saving Tips
Second Life can get expensive quickly, but it doesn’t have to. Here’s how to make your Linden dollars stretch:
Always grab demos – everything looks amazing until it clips through your arm.
Watch for weekend sales – events like Fifty Linden Friday and Happy Weekend are a goldmine.
Look for freebies and group gifts – many brands give out starter skins, shapes, or even entire avatars.
Join useful groups – some communities share sales, free finds, and tutorials every week.
Wait for holiday events – Lelutka often gifts free heads around Christmas, and it’s worth the patience.
Final Advice
Don’t rush your avatar. The best looks evolve over time. You’ll probably change your shape ten times, try five heads, and swear off a brand or two before you’re happy. That’s normal.
Second Life is about expression, not perfection. What matters is that your avatar feels like you, whether that means polished and glamorous or barefoot with a surfboard.
So take your time, explore, and enjoy the process. You’re not just creating an avatar. You’re building the person you’ll become in this world.
I approve of this guide. 🙂
To be frank, I think this guide and the questionnaire should be included in an onboarding system to help new avies enter this most incredibly complex and rewarding world.
Thank you for your time and effort on all this information, it is appreciated.